Part One · The Explorer — Chapter 10
Developing Your First Roll
The Non-Negotiable Tank
Featured masterWarren E. Motts (The Master Who Taught Me)
Chapter brief: baseline standard and assistive themes
- Film stock
- ISO 400 Panchromatic (Tri-X / HP5+)
- Developer
- Kodak D-76 (1+1) @ 20°C
- Paper
- Fiber-Base (FB) Variable Contrast
Assistive themes
- film reel loading entirely by touch
- the tank agitation rhythm
- the 20°C temperature standard under fingertips
- boundary-layer fluid motion against the emulsion
Reading level: Explorer
Master Opening: Warren E. Motts and the Uncompromising Tank
In Columbus, Ohio, behind the front counter of Motts Photographic Center, stood Warren E. Motts. A triple-guild master photographer and military veteran, Motts commanded the camera and the darkroom with the absolute, uncompromising precision of Ansel Adams’ tonal scale. He did not view photography as a casual pastime, nor did he indulge unearned praise.
To understand why Motts demanded such absolute rigor, one must understand where he came from. Long before operating his studio for a quarter-century in Columbus, Motts executed classified scientific, military, and industrial imaging for the prestigious Battelle Memorial Institute. In that high-stakes environment, an exposure error, a temperature fluctuation, or a chemical flaw did not merely result in a disappointing picture—it meant ruined research data, lost forensic evidence, or compromised national archives. Later, as the official photographer for the 1975–1976 American Freedom Train—a 26-car steam train touring all 48 contiguous states during the U.S. Bicentennial—Motts was entrusted with photographing over 500 priceless national treasures, including George Washington’s handwritten copy of the Constitution, Abraham Lincoln’s manuscripts, and lunar rock samples. Under harsh display glass and variable lighting, there were no second chances, no digital previews, and no post-processing algorithms. The tonal separation between deep shadow and pristine highlight had to be calculated in the brain and executed flawlessly in the tank.
Motts earned the rare distinction of Triple-Guild Leadership, serving as President of the Professional Photographers of America (PPA, 1990), President of the American Society of Photographers (ASP), and President of the Professional Photographers of Ohio (PPO). Awarded the Master of Photography (M.Photog.), Photographic Craftsman (Cr.), and the coveted Fellowship of the ASP (F-ASP)—a peer-reviewed honor granted to a tiny fraction of master photographers—Motts eventually founded the Motts Military Museum in Groveport, Ohio, and was inducted into the Ohio Veterans Hall of Fame.
When I was fourteen years old, my mother brought him my earliest prints—studies of rough bark, weeds, and raw gravel. Rather than dismissing a child’s raw frames, Motts took them seriously. Over a few quiet conversations, he sat with me, teaching framing, the balance of the rule of thirds, and the rigorous discipline of Zone values. He saw an instinct for light and planned a formal apprenticeship for my eighteenth year.
Why Warren Motts Is in This Book
This book is anchored by the masters of Group f/64, but Warren Motts stands beside them as its contemporary master—for one simple reason: without his encouragement, I would not have stayed with photography. His direction was exactly what a fourteen-year-old needed and nothing more: here are the basics, and here is Ansel Adams. In private with my parents, he told them photography was my path. Decades later, that is still the shortest accurate description of my life ever spoken aloud.
One of those sessions has never left me. I brought him a bundle of prints—nature scenes, landscapes, close-ups, all shot in color—and he worked through them slowly, one by one. Among them was a photograph of bare tree branches against a storm-dark sky, a color print on color paper with no filters, the clouds rendered in deep bruised purples—and I had mounted it deliberately upside down.
That was the trick of it—the first time I deliberately tried to make a viewer feel something with a photograph. Right side up, it is just a shot of a spooky dark sky; the eye files it away in a second, done. Turned upside down, something quietly stops working. The branches hang where branches should never hang, and the viewer feels a slow, unexplained unease. They think they are feeling the dread of the storm. They are not. What they are feeling is their own brain sounding an orientation alarm—that tree is growing the wrong way, something here is not right, turn it back—and misreading that alarm as the mood of the sky. The confusion and the vision fuse, because the storm clouds are correct either way; only the tree betrays the trick. The body catches the lie before the mind can name it, and the tension holds until someone rotates the print and it releases with a small laugh of recognition. I was fourteen, and I had built a photograph that could hold a stranger in suspense.
Warren held that print for a long time, looking deep into the clouds—then slowly turned it right side up, studied it, and turned it back upside down. His moustache curled up as he smiled. He had seen through the ruse completely—and he left it inverted. “Aw, you caught it,” I said. He approved of the mechanism, and more than that, he respected the intent behind it. I later entered that print in a contest and stubbornly kept turning it back upside down every time someone righted it. It placed fifth—out of four awarded places—and I was genuinely proud: it had pushed that far past other wonderful shots on the strength of one quiet, deliberate disorientation.
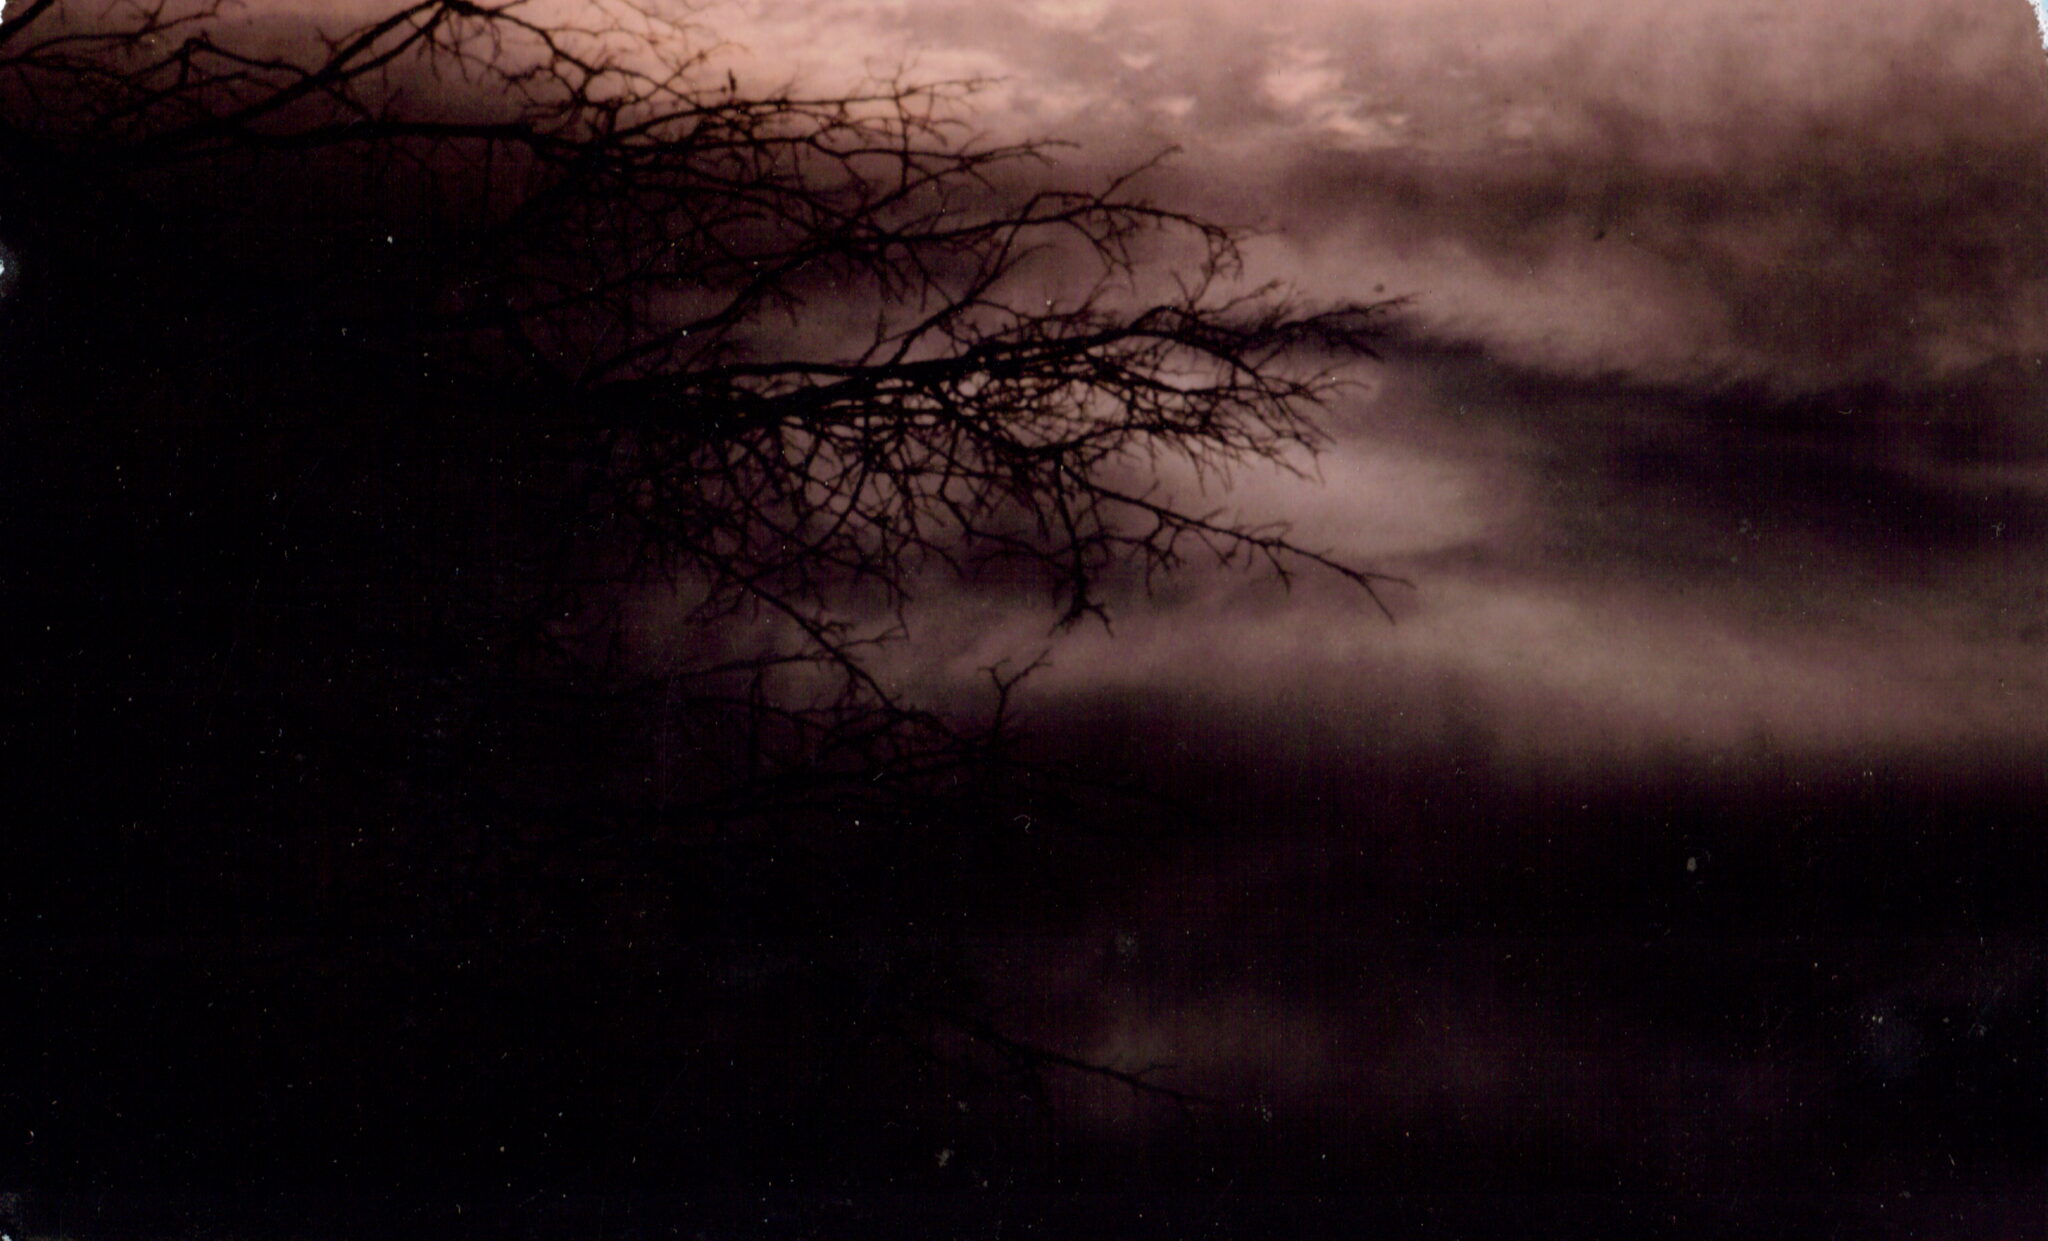
ASSISTIVE IMAGE DESCRIPTION — The Storm Print (presented inverted)
- Subject & Composition: Dense, leafless tree branches reach across the frame in jagged, intricate networks of fine black twigs, set against a stormy sky of heavy, low clouds. The photograph is intentionally presented upside down: the branches hang downward from above, defying their natural upward reach, while the dark cloud mass looms at the bottom of the frame like rising ground fog.
- Color & Tonality: This is a color print made on color paper with no filtration—the purples are the natural color of the storm light. The palette moves from pale, luminous lavender in the lit cloud edges down through dusty violet to near-black in the shadows and branch silhouettes.
- The Intended Effect: Right side up, this is simply a dark, spooky sky. Inverted—as the author intended, and as it is shown here—the hanging branches produce a quiet, unexplained unease. The viewer typically misreads that unease as the mood of the storm; in fact it is the brain’s own orientation alarm, triggered by a tree growing the wrong way in a sky that reads correctly in either orientation. Most viewers cannot name what is wrong until the image is rotated back and the tension releases. That deliberate disorientation is the photograph—the author’s first attempt to engineer an emotion in a stranger. It survives from the bundle of color work the author brought to Warren Motts, the session that ended with Motts suggesting he try black-and-white film, like Ansel Adams.
It was his response to that color work—those landscapes, those close-ups, that inverted storm—that produced the direction I had needed without knowing it: try black and white, like Ansel Adams. Color could identify the subject; he wanted me to learn what light itself was doing. And then he said the thing I have carried ever since: that I reminded him of the spirit of Ansel Adams—that my love for nature came first, always. He was right. Like Adams, I am a nature lover who photographs the beautiful things I see in order to share them; like Adams, I want to bring people back out into nature, to visit my world and show me what they saw in theirs.
Warren dedicated his life to pursuing his desires—decades of photography, then a museum built to preserve American military history so it would not be forgotten. That example is the other half of why he is in this book. The Guild is my attempt to do for the silver craft what Warren did for history: preserve a disappearing discipline, teach it to whoever walks in, and build something that lasts long after its founder. He documented American history; I am trying to keep the chemical memory of photography alive—explained from the digital side, so the next generation can find the door.
The lesson Motts left in my hands before anything else was this: the developing tank does not negotiate with your enthusiasm.
You can hike ten miles through mountain passes, calculate your shadow placement with mathematical perfection, and wait hours for the light to graze a subject, but the moment you pour developer into the tank, your physical discipline is all that stands between an enduring piece of silver art and blank celluloid. Mastery is not loud or flashy; it is quiet, methodical, and repeatable.
The 300-Foot Lesson: Gear Discipline and the Stuck Curtain
Early in my journey, I received a brutal, unforgettable lesson in mechanical equipment discipline that reinforced everything Warren Motts taught. I embarked on my first major expedition to the majestic Colorado Rockies, carrying 300 feet of bulk-loaded black-and-white film. For days, I hiked alpine trails, framing snow-capped peaks, deep timber shadows, and roaring mountain streams. Every time I pressed the shutter button, the camera responded with a satisfying mechanical click, the mirror flipped smoothly, and the film advance lever ratcheted to the next frame. Everything felt perfect.
I returned home, stepped into the darkroom with quiet pride, and carefully processed roll after roll. But when I pulled the negatives from the wash, my heart sank into my stomach.
Out of 300 feet of exposed film, every single foot except the first two feet was completely wiped—dense, solid, overexposed silver fog with zero image separation.
The culprit was a sticky shutter curtain that had hung wide open inside the camera body. Because the mirror cycled and the shutter release button clicked normally, my fingers and ears had been fooled. The camera was sweeping continuous, unthrottled daylight across the open film plane with every step I took across the mountains.
That devastating loss taught me that discipline begins long before chemistry touches the tank. A simple daily cleaning—inspecting the focal-plane shutter, checking curtain tension with the camera back open, and clearing micro-grit—would have revealed the stick immediately and saved 298 feet of mountain memories. Equipment is an extension of your hands; treat it with daily, methodical care.
The Physics of Development: Time, Temperature, and Agitation
Film development is a controlled chemical reduction reaction. When light strikes silver halide crystals in the camera, it creates a microscopic latent sub-speck of metallic silver (). In the darkroom, the developer reduces those exposed crystals into solid metallic silver grains, multiplying the latent image by an amplification factor of one billion times ().
To achieve repeatable, predictable density, you must control the three non-negotiable variables of the chemical triad:
1. Temperature Control (The 20°C / 68°F Standard)
Chemical reaction kinetics are hyper-sensitive to temperature. Higher temperatures accelerate developer activity, increasing contrast and density exponentially; lower temperatures retard chemical activity, leaving shadows underdeveloped.
- The Guild Standard: Always bring your developer, stop bath, and fixer to 20°C (68°F) using a water bath before starting.
- Thermal Tolerance: Keep temperature drift within throughout the development cycle.
2. Time Control
Development time dictates highlight density (Zone VII through Zone X). Because developer activity continues until the stop bath halts the reaction, timing begins the second liquid enters the tank and ends the moment the stop bath is poured in.
3. Agitation Kinetics (Boundary Layer Fluid Dynamics)
As developer reduces silver halide crystals, chemical byproduct (bromide ions) exhausts the active developer solution sitting directly against the emulsion surface. Without agitation, this exhausted boundary layer settles downward, causing uneven development, bromide drag, and mottled skies.
Agitation schedule (D-76 1+1 at 20°C / 68°F):
| Clock | Action |
|---|---|
| 00:00 | Pour D-76 rapidly into tank |
| 00:00 – 00:30 | Continuous gentle inversion (180° rotation and return) |
| 00:30 | Firmly tap tank bottom twice on bench to dislodge air bubbles |
| Every 30s thereafter | 5 seconds of gentle inversions (2 full inversions) |
Step-by-Step Tank Execution Protocol
Follow this exact sequence for processing your baseline roll of ISO 400 film in D-76 diluted 1+1:
- Dry loading (total darkness / changing bag): Load film onto plastic or steel reel, clip leader, and place into tank. Secure center column and light-tight funnel cap. Once the lid is locked, daylight safety is restored.
- Developer pour (D-76 1+1 @ 20°C / 68°F): Start timer. Pour developer cleanly down the central funnel cap. Agitate continuously for the first 30 seconds. Tap tank firmly on the bench to dislodge surface air bubbles.
- Intermittent agitation: Every 30 seconds, perform 2 gentle 180° inversions over 5 seconds. Smooth fluid motion ensures fresh developer replaces exhausted boundary chemistry.
- Stop bath (15–30 seconds): 10 seconds before development time ends, pour out developer. Immediately pour in indicator stop bath (20°C). Agitate continuously for 30 seconds to instantly neutralize alkalinity.
- Fixer (3–5 minutes): Pour in rapid fixer (20°C). Agitate 5 seconds every 30 seconds. Fixer dissolves unexposed silver halide crystals, rendering film light-safe.
- Archival wash & Photo-Flo: Wash in running water (20°C) for 20 minutes (or 12 tank fills using the Ilford method). Finish with a 30-second bath in diluted Photo-Flo wetting agent to prevent water spots. Hang film in a dust-free cabinet to dry.
The Falcon’s Philosophy: Turn Mistakes into Discovery
While process discipline prevents catastrophic failures like stuck shutter curtains or temperature spikes, remember the ultimate spirit of this craft:
Explore, make mistakes, and learn to turn those mistakes into something new. Film is your tiny piece of the stars to play with—have fun. Or simply turn it upside down.
A thin negative is not a total defeat; it is a lesson in shadow placement. A scratched emulsion is an invitation to explore hand-toning, solarization, or alternative textures. Every mistake you make in the field or darkroom is a diagnostic clue that sharpens your eye and deepens your command over light.
Assistive & tactile haptic guidance:
- Tank agitation: Feel the internal fluid weight shift across the palm during 180° inversions. Listen for the smooth surge of liquid.
- Reel loading: Trace the outer spirals of the reel with thumb tips to confirm smooth, friction-free film alignment before capping.
- Thermal audition: Use a talking digital probe thermometer or tactile notch ring on fluid graduate cylinders to verify the 20°C baseline.
Falcon Assignment 10: The Baseline Roll Execution
- Perform a pre-flight camera check: open the camera back, trip the shutter across three speeds, and visually inspect the shutter curtain for smooth movement.
- Load an ISO 400 roll, expose 12 frames across varying light values, and log your Zone placements.
- Mix fresh D-76 (1+1) at 20°C.
- Execute the step-by-step tank protocol in total darkness, enforcing agitation timing and temperature discipline.
- Hang the negatives to dry and inspect your first physical silver latent image!